Friday, December 31st, 2010 | Author:

I’ve got a GE side by side fridge (model #GSH25KGMDWW) and we went away for about a week and half and when we came back the water dispenser was no longer working, but the ice maker was still working fine.  I’m not sure when exactly it stopped working, but this is the first time it has happened and we’ve had the fridge for about 5 years now.

So we ignored it for a while and after getting annoyed enough I looked for some answers out on the web and found a page that had a fix for it.  That’s great, but I thought I’d just show it in a more graphical way.

Step 1

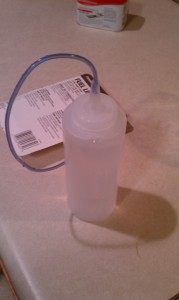
Find a squeeze bottle of some sort.  I have some kitchen squeeze bottles I use all the time so I used one those, but the original poster reccomended a hershey’s chocolate syrup bottle (cleaned out of course).

Step 2

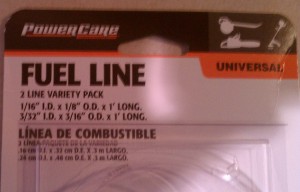
Buy a package of fuel lines from home depot (< $4) as shown in this picture:

Step 3

Put the small fuel line (outside diameter of 3/16″) into your squeeze bottle.  If it isn’t a tight fit into the nozzle just tape it up some.

Step 4

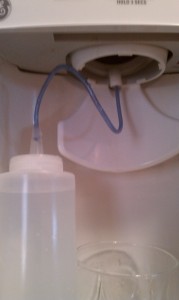
Put the other end of the hose into your water spout on the fridge and give it a squeeze and keep working it backwards as you go.   It only took maybe 10-15 seconds to get mine cleared.  Make sure to put a cup there to catch the water coming back out.

That should just about do it!  If you aren’t sure that you have a frozen blockage (there are other things that can break and cause the same issue of no water) simply insert some flexible thin object (I used some of the plastic string from my yard trimmer) and if you hit a blockage with that it is probably just a frozen spot in the line.

Thursday, December 02nd, 2010 | Author:

Okay this has always bugged me.  Let’s say that you have an Excel workbook that has 10+ Sheets in it.  Something like this:

So you want to find a sheet.  You have to grab the little spacer bar and resize the horizontal scroll bar at the bottom, etc…  If you have sheets (tabs) with really long names then navigation again becomes a pain in the butt.

Well browsing around I finally found the solution to this annoyance!

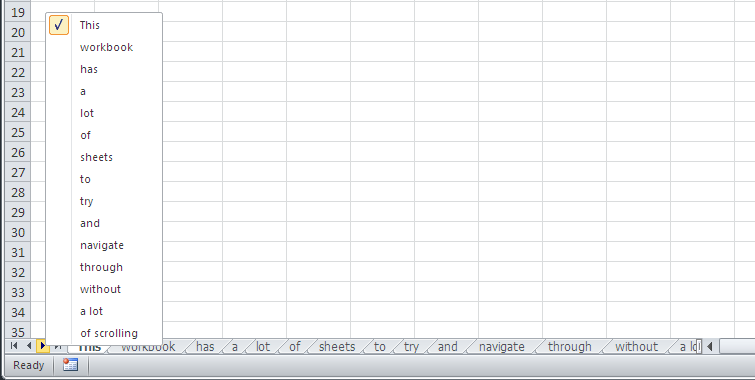
Right click on your sheet navigation buttons below and you will be presented with a list of your sheets to pick from in a MUCH easier fashion.  Click in the area shown below:

And you will get a nice list to pick from like this:

Awesome!

Category: Excel  | Leave a Comment
Friday, November 12th, 2010 | Author:

Okay… This one has always bugged me.  I like to have an ID or identity field on my rows even in spreadsheets just so that when I resort them someone can still say “Look at item #67” and I know what they are talking about.

Well I pieced together some stuff I found on the web (I think this was where I found the example of the max_Each_Column function) and this appears to do the trick. Very useful and I absolutely love it.  It requires a macro enabled excel file, but that is the price we pay…

Here is a YouTube video of it…

Add this code to your worksheet and then modify it as needed  to get the correct columns.  As-is when you type in column b and then leave the cell it will add a value to the cell in column A.  It looks in the column A, finds the max value and then adds one to it.  If the ID already has a value then it leaves it alone, so editing rows doesn’t repopulate your ID field.  Easy peasy right?

Private Sub Worksheet_Change(ByVal Target As Range)
If Target.Column = 2 Then 'This is the column that causes the ID to be created
'This uses the target offset so it assumes in two spots below that the column to update is "A" and
'that the column is one position to the left of the target column above
    If Target.Offset(0, -1).Value = "" Then
       Target.Offset(0, -1).Value = Application.WorksheetFunction.Max(Columns("A")) + 1
    End If
End If

End Sub

Function Max_Each_Column(Data_Range As Range) As Integer
    Dim TempArray() As Double, i As Long
        If Data_Range Is Nothing Then Exit Function
        With Data_Range
        ReDim TempArray(1 To .Columns.Count)
        For i = 1 To .Columns.Count
            TempArray(i) = Application.Max(.Columns(i))
        Next
    End With
        Max_Each_Column = TempArray
End Function
Category: Excel  | Tags: , ,  | 13 Comments
Sunday, March 28th, 2010 | Author:

So on my netbook I have Windows 7, and for some reason the volume function on the taskbar is just wicked slow, so I wanted a quick way to mute, unmute, etc… in a quicker fashion.

Well I found a command line tool that gives you a lot of functions regarding volume, logging off, standby, etc…  So if you grab the program called NirCmd here (http://www.nirsoft.net/utils/nircmd.html) then you can create shortcuts to mute/unmute, raise or lower the volume, etc…

The other option if you have this same issue is to download intellitype and then  you can use some function keys to do the same thing.  I’ve had some issues with this after the computer comes out of hibernation though.  The nircmd stuff seems to always work.

<shrug>  I think what I really want is a mute button on my chrome browser itself.  Pretty much 90% of the time I do not want my browser to make any noise.  I don’t want stupid ads talking to me, or crappy webpage music playing…  I wonder if they’ll add that in for me.

Category: Misc  | Tags:  | Leave a Comment
Wednesday, November 04th, 2009 | Author:

Okay this was one of those things that always annoyed me, but I never really put any effort into fixing.

At work we have *REALLY* long shares on our network so when I would open up explorer or anything I would see:

This_Is_A_Dumb_Share_Name on ‘Server Description goes here (servername)’ (Q:)

Well that means the left pane of my explorer window had to be huge before I could see that the drive letter on that was “Q”    Very annoying.

Well you can change this behaviour very easily with a registry key.  (Only tested in XP)

Create a new REG_DWORD here:

HKEY_LOCAL_MACHINE\SOFTWARE\Microsoft\Windows\CurrentVersion\Explorer

Name this new REG_DWORD “ShowDriveLettersFirst”

Value

0= Show drive letters after description (default)

1 = Show drive letters first only on network drives, local drives show after

2 = Don’t display a drive letter (WHAT?!  Why would you do that?!)

4 = Show drive letters before descriptions

So set the value to 4.   Restart and there you go!

Category: Misc  | Tags: ,  | Leave a Comment