Blog Archives

Thursday, December 25th, 2008 | Author:

There is just something about physics based games that I love.   This web one is fabulous!


Fantastic Contraption!

Category: Games  | Tags: ,  | Leave a Comment
Tuesday, December 16th, 2008 | Author:

I forget what the heck I was looking for but I came upon this entry from Megnut that is absolutely hilarious.

I hope everyone else sees the humour in this…

Category: Cooking  | Tags: , ,  | One Comment
Tuesday, December 09th, 2008 | Author:

Well I’m getting ready to try a recipe for cookies from my friend Rachel.   They are called “cowboy cookies” and I’m not 100% sure what makes them cowboy-ish.   Is it the baked beans? The cornbread? The dutch oven?  I’m not really sure yet, but I’ll let you know when I try them.

Maybe they’ll make me think of the dusty plains from whence I came.

Category: Cooking  | Tags: , , ,  | Leave a Comment
Sunday, December 07th, 2008 | Author:

Okay I guess I need to mention cooking on here as well…  I’ll add a new category for that.   I tried making some cinnamon roll sort of items recently.   It wasn’t such a success…   

First try:  Yeast was dead… I was in a hurry and didn’t look at the expiration date on the packet of yeast.   So when I checked on the dough after an hour there was absolutely no rising going on.  None.  But I figured that I’d go ahead and make some cinnamon rolls out of it anyway since I already put in all that effort.  They were OK, but very dense.

Lesson learned:  Senor Fleischmann is not bullshitting about the packets of yeast having an expiration date.

Second try: Dough seemed to rise fine but I used bread flour… I’m not sure why I did this.  So they turned out….well bready.  Surprise surprise.   Taste was OK, but I did them as like a cinnamon twist and there really was no gooiness (due to the breadiness probably) and the amount of cinnamon, sugar and butter I used was woefully inadequate.  It turned out as bread with a dash of cinnamon and some icing.  🙂

Lesson learned: Bread flour makes bread, not light and fluffy cinnamon rolls.

So anyway…that was my most recent adventure in cooking…when I have something good I’ll make sure to post a link here.   So now about my cooking…

Favourite websites:

  • Recipezaar – Their user interface is ridiculously good.  Not only do they have some great recipes and some great people putting them on there, but the functionality of the site is awesome.  What sweet features you ask? (This is my profile)
    • Calories and nutritional information is calculated by parsing the ingredient list… this means you can take your old home recipes, put them in RecipeZaar and now know the nutritional value of it.  This is awesome.
    • Filtering (they call it “sifting” ha ha) in real time.  So let’s say you want a cookie recipe, you navigate to cookies and then tell it to “Sift by ingredient” and you are presented with a list of all the ingredients and how many recipes they are in.  So you can include/exclude specific ingredients and know immediately that if I did “Cookies” (8,725 recipes) and then excluded “Sugar” that there are still 4,977 recipes without sugar.  Great feature to exclude ingredients you don’t like.
    • If you get a pay account you can keep private recipes (old family recipes) that you don’t want to share, but that you want to store and that you may want nutritional information on.
    • Great rating and comment system.  Some great information in the comments on how people have modified the recipes.   
    • It is almost like a social networking site for cooking
  • Cooking for Engineers – Really really great site.  Neat recipes but the real meat on here for me is the articles on equipment and techniques and the comments on them.  There are tons of pictures, explanations, as if someone had approached cooking from an engineer’s perspective.  Brilliant!  Again, a very well done site.  Great ideas like this one to make clarified butter very easily.

Well that is probably enough for one post… I’ll do more later on some recipes and tools, etc..  

     
Category: Cooking  | Tags: ,  | One Comment
Wednesday, December 03rd, 2008 | Author:

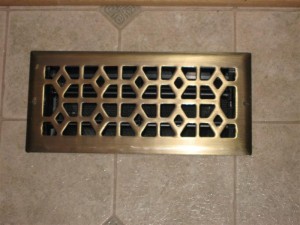
So my 1 year old decided to start playing with the air vents recently… I had never even thought about these vents before she got into them.  Essentially they were just held there by gravity so she could easily just lift them out and then throw stuff down that hole.  I think we lost a tennis ball somewhere into the HVAC system…  So I decided it was time to babyproof them… here are the steps with some pictures to help…

Tools & Supplies:

  1. Drill
  2. Assorted drill bits
  3. Vent Covers
  4. Screws
  5. Hot Glue Gun
  6. Countersink bit
  7. Screen Replacement Material

Instructions:

  1. Purchase some new vent covers (I had to do this step b/c my wife wanted new pretty vent covers… you can skip this one unless your wife also wants new pretty vent covers…)    Make sure that if you’re buying something that you get something sturdy.  I don’t think the all-plastic models would hold up well.  I ended up with the 4″x10″ covers from lowes.  The inside part is plastic but the whole top was solid metal which seemed fine to me.  
  2. Buy some replacement screen material something like this from Lowes works just fine.
  3. Buy the screws you want.  Now I wanted something that looked decent, but I couldn’t find anything at Lowes.  I went to a small hardware store down the road and found some antique black cabinetry screws with a square drive.  PERFECT!
  4. Depending on the screws you get you may also need a countersink bit for your drill (if you got a metal vent in step #1, make sure that the countersink bit you get works for metal too!)
  5. Fit the vent into the hole and decide where you need to drill so that you will hit the floorboard surrounding the vent.  Some of these vent holes look like they were cut with a chainsaw, so make sure that you’re going to be drilling into something.  I reccomend looking at each of the holes individually because the guy cutting them was not only using a chainsaw, but was also hammered.
  6. Decide on the placement and then drill a hole for the screw… pick you drill bit size very carefully.  WIth the screws I chose if I made the hole big enough for the thread then the head of the screw could almost slip through.  *BUT* the metal was too thick on the top of the vent to thread the screw through like you would normally…  The solution?   Countersink both sides of the hole so that it makes an hourglass shaped hole for the screw to easily thread throught but still allow the head to have good purchase.  
  7. Now cut a piece of the screen to fit the bottom part of the register.  You want to make this long enough so that it will loop over the slats when you open the vent.  Once you have this sized properly cut it out and just hot glue it in place.  (3 globs of glue on each side was good enough for me.)
  8. Let the glue set for a bit and then go drill the floor boards and screw them down!
  9. Ta-Da!
Category: Home Projects  | 23 Comments